I recently got my amateur radio certificate and was interested doing some APRS messaging so I purchased a Sainsonic AP510. It’s a nice little TNC with GPS, bluetooth and a thermometer.
It comes with minimal documentation in 4 languages and no software to configure it.
There’s a Yahoo Group that has firmware, configuration software and upgrade software. It’s annoying that you need to sign up for a Yahoo account to download the files there.
There’s also a Chinese website that has more firmware and some forums ( the Yahoo site has mined most needed data from there )
There’s also a good French website that explains how to flash the firmware and has some files needed for windows 7.
I found a German site that explains the serial cable pinout.
Upgrading the firmware
Standard disclaimer: this has worked for me but if it fails and bricks your AP510 I’m not responsible.
So far I have only gotten this to work on Windows, it will run under Wine but won’t connect. On windows XP these files AVRTTupdata.exe.zip and the VB6 runtime will be enough. On any newer windows MSCOMM32.OCX and MSSTDFMT.DLL will be required as well.
Make sure the ini file is in the same directory as the AVRTTupdata when you run it as it has the correct setup for the AVR in the AP510. The first time you run AVRTTUpdata it will be in Chinese, select language and put it into English.
Use the option->comport menu item to chose the correct comport. Don’t change any of the other settings.
Use the folder icon to load the hex file into the Upgrade tool.
Turn off the AP510.
Push and hold the power button on the AP510.
While still holding the power button push the chip icon and the download will begin.
Keep holding the power button until the download completes.
Voila your AP510 is now upgraded.
Linux Configuration tool
Update: This is deprecated use chirp instead as it now supports the AP510
The windows configuration tool is in the archive above. I didn’t want to start up a VM each time to change the config so I wrote a simple python tool AP510-setup to configure it. You’ll need to edit the script to change the comport, callsign and other settings. I’ve licensed it GPL V2 and please send me any improvements you make to the script.
To use the script:
Edit the configuration
Turn the AP510 off
Start the script
Turn the AP510 back on
The script should dump the current settings, update the new settings and then dump the new settings
EDIT: Jan was nice enough to reverse engineer a schematic for the AP510.
I figured out how to read and write the i2c bus on the imWatch so I can now sample at whatever rate I’d like. This tarball includes code that should work upto 200Hz without overloading the processor.
Faster rates should be possible but it would mean getting the FIFO in the accelerometer working and then backdating the samples.
Building the JNI
I’m not going to detail how to use a JNI within an Android project. there are plenty of other tutorials out there.
From the tarball put “akkea-jni.c” and “Android.mk” into the jni directory of your android >project. Then run
Add these native prototypes and constants to your android code.
public native int readAccel( SeismoVector vector, int fd, long startTime );
public native int openI2c( String path );
public native void closeI2c( int fileHandle );
public native int i2cReadReg( int file, int addr, int reg);
public native int i2cWriteReg( int file, int addr, int reg, int val);

int i2cHandle;
final byte ACCEL_I2C_ADDR = 25;
final int ACCEL_RATE_OFF = 0;
final int ACCEL_RATE_1HZ = 1 << 4;
final int ACCEL_RATE_10HZ = 2 << 4;
final int ACCEL_RATE_25HZ = 3 << 4;
final int ACCEL_RATE_50HZ = 4 << 4;
final int ACCEL_RATE_100HZ = 5 << 4;
final int ACCEL_RATE_200HZ = 6 << 4;
final int ACCEL_RATE_400HZ = 7 << 4;
final int ACCEL_RATE_1_6KHZ = 8 << 4;
final int ACCEL_RATE_5KHZ = 9 << 4;
The I2C bus and accelerometer need to be setup
public boolean openI2C() {

  try
  {
    Runtime.getRuntime().exec("chmod 777 /dev/i2c-0");
  } catch (IOException e) {
    e.printStackTrace();
  }

  i2cHandle = openI2c( "/dev/i2c-0" );

  if( i2cHandle <= 0 )
    return false;

  int[] arr = new int[4];
  for( int i=0; i<128; i++ ) {
    arr[0] = i2cReadReg( i2cHandle, ACCEL_I2C_ADDR, i );
    if( arr[0] != 0 )
      Log.d(TAG, "Register " + String.valueOf( i ) + " = " + String.valueOf( arr[0] ));
  }

  int val;
  val = i2cReadReg( i2cHandle, ACCEL_I2C_ADDR, 0x20 );
  val = ( val & 0x0F );

  switch( HZ ) {
    case 1:
      val |= ACCEL_RATE_1HZ;
      break;
    case 10:
      val |= ACCEL_RATE_10HZ;
      break;
    case 25:
      val |= ACCEL_RATE_25HZ;
      break;
    case 100:
      val |= ACCEL_RATE_100HZ;
      break;
    case 200:
      val |= ACCEL_RATE_200HZ;
      break;
    case 400:
      val |= ACCEL_RATE_400HZ;
      break;
    case 1600:
      val |= ACCEL_RATE_1_6KHZ;
      break;
  }

  i2cWriteReg( i2cHandle, ACCEL_I2C_ADDR, 0x20, val );

  val = i2cReadReg( i2cHandle, ACCEL_I2C_ADDR, 0x20 );
  Log.d(TAG, "Register Rate " + String.valueOf( val ));

  return true;
}
I then use a TimerTask to read the accelerometer at whatever rate I want.
class sensorTask extends TimerTask {
  @Override
    public void run() {
      long time;

      if( index >= totalSamples ) {
        Log.d(TAG, "index past end of array");
        return;
      }

      SeismoVector vector = new SeismoVector();

      time = readAccel( vector, i2cHandle, startTime );

      if( startTime == 0 )
        startTime = time;

      vectors[index++] = vector;

    }
};
I purchased the X230 Quad copter kit from hobby king in December. I’ve been learning to fly it and in the process have been breaking parts.
Hobby king doesn’t sell replacement parts so I’ve been patching it up as I go along. Some of the pieces are getting too broken to be patched. I’ve created a DXF of the parts and I’m going to have them built out of carbon fibre for increased crash resistance 🙂
At left is a 1:2 jpeg of the parts. If you’d like the DXF it’s here
About a year ago I was contacted to write some iOS software to measure tremor in MS patients. I have no interest in writing iOS software. The only real hardware requirement was that the device had an accelerometer so I suggested using an Android device instead. The device would need to be fastened to the patients arm and be lightweight to limit it’s influence on the tremor. The perfect fit seemed to be an Android watch.
There were two capable Android watches available at the time, the WiMM One module and the i’m Watch. The WiMM One was already shipping, had stock and a price point less than half of what the I’m Watch was going for. At the time the i’m Watch was taking pre-orders with a promise of shipping soon.
I ordered a few of he WiMM modules and got to work writing the beta software on a Nexus S. I demoed the first version two weeks later.
The Software
Once the demo proved that I could get the desired sample rates I started shrinking it down and learning the WiMM API. Most of the differences lie in the way that the application screens are laid out. That allowed me to keep most of the functional code from the demo application.
The application is very simplistic from a GUI perspective in that it only displays a single button and a countdown timer. This is partly because the application needs limited user feedback but it’s also due to potential users of the application. One of the uses would be to monitor outpatients to track their tremor over time without requiring a clinic visit. These users would have limited eye hand coordination so the simpler the interface the better.
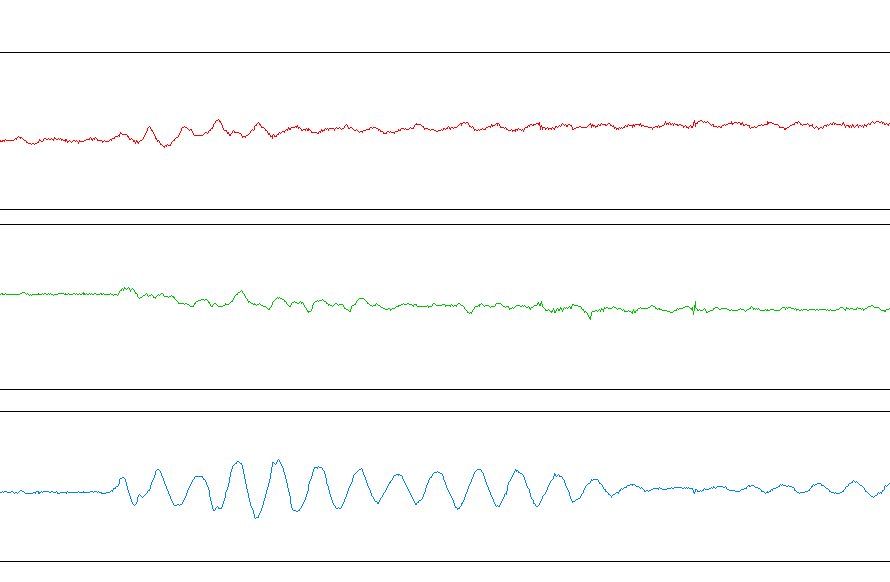
Another reason for targeting the WiMM device was it included wifi that would allow automated data collection. After collecting a data series the watch would connect to a server to upload the data. Once uploaded the data would be saved as a CSV. Then GNUplot was used to transform the CSV into a line graph of the X, Y and Z axes. After the data gets plotted the server also does an FFT and plots that. The FFT is done to expose any frequency elements in the tremors.
This is an example of the post processed data
Challenges
There were a number of challenges with using the WiMM watch. I was familiar with Android 1.6 but the version on the WiMM is slightly modified for the smaller screen and other hardware peculiarities.
On of the challenging differences is the watch doesn’t follow the Android sensor API for the accelerometers. You are able to set a rate using the defines SENSOR_DELAY_FASTEST, SENSOR_DELAY_GAME and SENSOR_DELAY_NORMAL however you can’t specify an absolute rate for updates. To get around this issue I sampled at the highest rate possible ( 200Hz ) and decimated the samples I didn’t need.
Using this technique I was able to get 100, 150 and 200Hz sample rates. For the most part this did work well but rates over 100Hz still had problems. There were occasional gaps in the data that lasted upto 120ms. After some investigation I found the Dalvik GC was logging with times that were amazingly close to some of the gaps in my data.
By pre-allocating as many of the accelerometer data structures as possible I reduced the number of garbage collection cycles and the subsequent spaces in the data. Even once I solved this there are still the occasional gaps. My best guess at this point is that the accelerometer and the GUI are running at the same priority and occasionally collide.
Successes
The table at left shows a comparison between the WiMM module and a Entran accelerometer. The WiMM is sampling at 100Hz and the Entran around 2KHz. The data shows that the WiMM compares quite well to the standard analog sensor.
Tremors in people are well below the 50Hz that the WiMM should be able to resolve so it would function as an acceptable measurement device for in or out-patients with temors and tremor related diseases.
Data is starting to come in from the studies using the software. It is showing some interesting repetitive osculations which we expected. At right is an excerpt from a MS patient recorded during a clinic visit.
There are currently 2 studies using the software, below is a synopsis of their work. Both of them should be publishing some of the results soon.
Study #1
Traditional tools for accelerometry are cumbersome and do not lend themselves to routine clinical use. Using a smart watch device for accelerometry makes data collection very simple and portable, and may allow for wider use of accelerometry for tremor analysis. The potential of the on-board hardware for data processing and display makes this even more exciting. As a proof of concept, I am collecting accelerometer data simultaneously from the WIMM One and a standard analog accelerometer, and coanalyzing the data offline in the MATLAB environment to determine whether the performance of the WIMM One is acceptable. After this, I am collecting data from patients with Parkinson disease and Essential tremor to compare some aspects of these tremors to see if the portable device might be a useful diagnostic tool.
Daryl Wile, MD, MSc
Neurology Resident
University of Calgary
Study #2
As a clinician-scientist, I envision both clinical and research-oriented applications for watch-based accelerometry in the evaluation of tremor in Multiple Sclerosis (MS).
Clinically, I frequently encounter tremor in MS (MST). It is notoriously difficult to treat, meaning that patients need to try many interventions before (if ever) we find one that works. This problem is compounded by: (1) patient mobility and transportation issues – it is difficult and inconvenient for patients to return to the clinic frequently for re-evaluation of treatment efficacy, and (2) clinic availability – usually, I can only follow-up with patients every six months.
In research trials, it is necessary to have patients return frequently to the clinic for re-evaluation (which is problematic), and it is ideal to have a simple technique for quantifying tremor response to treatment.
By collecting tremor data remotely, treatment efficacy can be evaluated quickly, quantitatively, and conveniently. In clinical terms, this means we waste little time finding a treatment that works. In research terms, this allows us to objectively evaluate, with minimal inconvenience to the patient, potential new therapies for treating MST.
Scott E Jarvis MD PhD FRCPC (Neurology)
MS Clinical Fellow
University of Calgary
Future Directions
WiMM has gone dark about what their future holds and has stopped selling the devices. They have also dropped all developer support.
This is where the i’m Watch comes into play. I’ve managed to reverse engineer the accelerometer and magnetometer in the watch and I’m currently rewriting the application to work on the new device. I’ve already written a native i2c library that can get data from the watch and it is sampling at 100Hz.
Next I’ll need to establish the accuracy of the new accelerometer so it can be used to replace the WiMM watch.
Wishlist for future releases
I’d like do some of the frequency analysis done directly on the watch.
Plotting would be nice too but I suspect viewing it on the small screen would be cumbersome.
The new accelerometer has a FIFO so I might be able to get reliable data at a faster rate than I can get timer ticks.
Use the form below if you’d like to contact me or either of the Doctors running the studies.
I tried to get the part number for the accelerometer from im Watch developer support and they refused to give it to me. The response was you don’t need need that information just use the supplied sensor library. I tried to tell them the library would only collect data at 10 Hz and I require 200 Hz. It also wastes time by always sampling the magnetometer and the accelerometer even if you only need the accelerometer data.
After trying for a few days to get the information from developer support I decided to figure it out for myself.
I wrote a little i2c scanner and enumerated the devices on the bus. I found a device at 0x19 and 0x1e. now to figure out what they are. I disassembled the the sensor library supplied by imdeveleoper.it and found the hex constant 0x19 in the initAccel function. So far so good.
I then stepped up my scanner to read all of the registers from 0 to 127. The first register was at 0x7 and the second was at 0xF and then a bunch more upto 0x2F. I had expected some kind of who am I at 0x0. No such luck. I re-read the registers a few times looking for the changing values. The values at 0x28 to 0x2d changed with the orientation of the device. Good I’ve found the accelerator, but which one ?
I started going through accelerometer datasheets and found that the st micro parts had a who_am_i variable at 0xF. I finally found a match, 0x33 in the LIS3DSH datasheet. The changing values also correspond to the locations of the x, y and z values so I’m pretty sure I’ve found the correct part. EDIT: i’m Watch support finally got back to me and it is actually the LSM303DLHC. The magnetometer and thermometer are both integrated.
So now I get to re-write the imWatch sensor library. The good news is that the accelerometer has a FIFO, can sample at 5KHz and has a temperature sensor. After I’ve re-written the sensor lib I’m going to see what’s hiding in the magnetometer.
After almost a year the IMWatch developer site has finally released a library to access the sensors. They even released an example application but no documentation ???
Fortunately there are some tools to decompile java apps.
Below are the prototypes for the two undocumented functions the you’ll need to use to get access to the sensors.
public SensorServiceInstance(int updateInterval)
public SimpleShakeDetector(Context context, OnShakeListener listener, int updateInterval)
The important argument here is the updateInterval. It’s an int but what does it represent. A few tests show it’s the number of milliseconds between samples. Reading the decompiled code implies that this value must be greater than zero but has no other limits.
The application I’m writing needs to have a 200Hz update rate so I tried setting this value to 5 ms. This doesn’t get the required update rate. It seems the practical lower limit to updateInterval is 100ms which doesn’t even match the game update interval for the Android standard sensors updates. 10 Hz isn’t even the lowest rate I can use for my application.
Digging deeper into the sources looks like they have included a native i2c library to access the sensors. I might be able to use that to get direct access and increase the update rate. Stay posted for a blog post on where I get with that.
The Lenovo Thinkpad 3G Android Tablet has been a lemon since it got released. When initially released the GPS in the tablet didn’t work. The ICS update fixed the GPS issues but caused more problems with 3G and Wifi. Here’s a link Lenovo Wifi and 3G issues.
Today I updated the tablet to ThinkPadTablet_A400_03_0070_0132_ROW and the 3G would no longer connect. I tried a Telus SIM card and a Bell SIM card. After 45 minutes on the phone with Telus tech support and 2 phone calls to Lenovo ( 1 that ended with the CSR hanging up on me for using big words ) the tablet would still not register on the Network.
With no resolution forthcoming from Lenovo I decided to ask the Great Google to help. Luckily some European customers have had a similar issue ( check post 28 which is an English translation of a German post ). The steps below are from those posts with Canadian cell providers instead of the European ones.
You will need a 2G SIM-Card. I used speakout wireless but Rogers or Fido should work too. You don’t need an internet plan for this to work. Anywhere below where I mention Telus you can also substitute Bell.
activate 3G (mobile broadband connection)
activate 2G only (go to: setting -> mobile connections and activate “use only 2G”)
press the reset button (the one between sim card slot and sd card slot
After the reboot you should have a 2G internet connection with the speakout card
reactivate 3G (go to: settings -> mobile connections and deactivate “use only 2G”)
you should now have a 3G connection with the speakout SIM-Card
you should be able to switch between 3G and Wi-Fi without any problems
Turn the tablet off.
Take out your speakout SIM-Card and insert your Telus SIM-Card
Turn the tablet on again.
The Telus SIM-Card should work now.
Overall I really can’t recommend this tablet as one of the primary reasons I purchased it was for the 3G functionality. I’ve already spent more time diagnosing this tablet than it is worth. The other business class value add from Lenovo can be had from other manufacturers for less. The business features also seem to make the tablet mush slower than comparable devices.
This was the second device I purchased as a small accelerometer based computer. So far I’m really not impressed by this device.
A lot of time and effort has gone into the look and finish of this watch. Too bad there wasn’t equivalent effort for funtionality
Pros
Polished interface
Cons
Poor battery life – another watch with phone like battery endurance.
Incomplete Android OS – no sensor libraries.
Poor developer support – many known issues not published
Outrageous pricing ( they seriously have one listed for $21000 )
Cloud based configuration
This one has been a fail pretty much since day 1. I ordered the watch in February and it didn’t show up until October. During that time they were pushing hard to have developers create apps for the device. I didn’t bother with their SDK as I needed hardware accelerometers for my software.
When the watch arrived I installed the latest version of the software, installed the SDK and started to write my first program for it. I hooked it up to the computer and tried to find it with adb, nothing. After messing around for a while I fired off an email to developer tech support. They informed me there is currently no adb support. Nice a new paper weight.
A month later on their site I find a new OS version that includes adb support. Excellent now maybe I’ll be able to use it. By downloading and installing adb for this device you void your warranty ??? You don’t really own a device until you’ve void the warranty so I installed the new developer rom.
For some odd reason adb on the watch only supports network mode.
A couple hours later I’ve written a shiny new app to talk to the sensors. But no matter how hard I try I can’t SensorManager.getSensors() to return a sensor. I start digging around the logs and find this.
W/HAL (20912): load: module=/system/lib/hw/sensors.imwatch.so error=Cannot load library: load_library[984]: Library '/system/lib/hw/sensors.imwatch.so' not found
So another email off to tech support Ticket: #EFB-458-37919 and they inform me they are trying to get that fixed for the next software update. So back on the shelf it goes.
At least it’s taught me something new. Howto generate a screen capture using adb.
I’ve been working with this device for about 9 months now. I’ve been writing some software for a medical accelerometer device for a couple of different research projects. Once the results of those studies get published I’ll link to them here.
Pros
Small form factor – 32×36×12.5mm
Lightweight – 22 grams and ~30 grams with the strap
Water resistant – I fully submerged it for about 5 seconds ( accidentaly )
Wifi – used to automatically upload data
adb support – standard
Standard sensors – the module has most of the sensors you’ll find in current phones
Cloud based configuration – should be an option not a requirement
power button – the module needs to be removed from the strap to get to the power button
Of all of the small form factor android devices I’ve been working with this is my favourite. As a developer device it’s great as it has all of the hardware sensors you’ll have in a phone and lots of great code examples. The hardware form factor is also interesting because of its’s size and that and i2c interfaces is accessible.
As a consumer device it still has some annoying quirks. I’ve never had the battery last more than 48 hours and typical was around 36. A watch that needs plugging in everyday has limited usefulness in my book. For my particular application it wasn’t a problem as it wasn’t ever used untethered for extensive periods.
Data entry is one of the most painful experiences on this device. I’m not talking about writing a novel here just try to get a wpa key entered. It’s got a rotating dial with the alaphabet and numbers, takes a long time to get from Aa to Zz.
Unfortunately it looks like it may no longer be being produced. Ted Ladd who was head of WIMM Developer Relations now lists his job as a university professor. I also contacted WiMM and they’ve stated “We’ve decided to move in a different strategic direction, which I can’t discuss”. I hope it’s a WiMM two.
Edit:
It looks like WiMM is discontinuing their support for WiMM one developers. I found a version of the WiMM addon package. I also did a recursive get of the documentation before they take that down. I also have a copy of their “Opensource Package”
Here are the sdk and the usb setup instructions for windows.


